
Your checkout page loads. An international buyer enters their payment details. But then the screen freezes and sends them to a page they don't recognize. They close the tab. You never hear from them again. That buyer was ready to pay, but you didn’t get the sale.
Research shows 18% of US online shoppers have left a purchase behind just because checkout felt longer or more complex. For international buyers, every additional step pushes them closer to leaving your checkout. Seamless payment integration fixes this issue by letting buyers complete their payment directly on your website.
This guide breaks down in detail what seamless payment integration actually is, how it works for global businesses, and the exact steps to set it up the right way.
Every time a customer reaches your checkout and something feels off, you risk losing that sale. A redirect to an unknown page, a slow-loading form, or an unfamiliar payment screen is enough to make someone leave.
Seamless payment integration connects your payment processing directly to your website or app. Your customer enters their payment details, completes the purchase, and gets a confirmation. All of it happens without being sent to a different page or a third-party site.
For instance, for an Indian business selling to a buyer in Canada, here's what that looks like in practice. The buyer adds a product to their cart, selects their preferred method (say, a local digital wallet or a credit card), sees the price in CAD, and pays. The entire process happens inside your website. Behind the scenes, the payment is authorized, the foreign exchange conversion is handled, and your funds are routed for settlement.
A single extra step in your checkout can cost you a paying customer. When that customer is in a different country, using a different currency, and already unsure whether your site is trustworthy, the risk is even higher. Here's why getting this right directly affects your revenue.
For Indian exporters, freelancers, and SaaS businesses collecting from global buyers, payment friction directly affects how fast you grow internationally.
Tip: If your current checkout redirects buyers to a third-party page, check your payment completion rates. Even a few percentage points of improvement from fixing that redirect can add up fast.
Most businesses know they need a good checkout. But only a few know what actually happens between the moment a customer clicks the pay button and the money reaches your account. Here's what happens, step-by-step:
1. Customer selects a payment method: At checkout, the buyer picks from the options you offer (credit card, digital wallet, bank transfer, etc.) and enters their details.
2. Payment data is sent securely: Your website sends the encrypted payment information to your payment provider's system. This happens in the background, with no page change for the buyer.
3. Authorization request: Your provider sends the transaction details to the buyer's bank or card network for approval. For international payments, this also includes currency and fraud checks.
4. Approval or decline: The bank responds in seconds. If approved, the buyer sees a success message on your site. If declined, they see an error with a clear next step.
5. Settlement: The approved funds are collected, converted to your preferred currency if needed, and deposited into your account on the agreed schedule.
The entire process takes a few seconds from the buyer's side. On the back end, the speed and reliability of this flow depend on how well your payment system is connected to your platform.
Note: If you sell to buyers in regions with low credit card usage (like parts of Southeast Asia or Europe), make sure your integration supports alternate payment methods for those markets.
The payment method you choose affects how much control you have over your checkout, how fast it loads, and how much work your team needs to put in. Here's a quick comparison of the main types.
Each type has a clear trade-off between ease of setup and control over the customer experience.
A hosted page sends your customer to a separate, provider-managed page to complete the payment. After they pay, they're redirected back to your site.
This is the fastest way to start accepting payments. You don't need a developer to build a custom checkout. The provider handles security, card data storage, and compliance on their end. For a new exporter or a freelancer setting up their first invoice payment flow, this gets you live quickly.
The trade-off is that the buyer leaves your site, even if briefly. For international customers who don't recognize the provider's brand, that redirect can feel risky.
An embedded form loads inside your website, usually as a small module within your existing checkout page. The buyer enters their card or payment details without leaving your site, but the actual processing is handled securely by the provider in the background.
This gives you brand consistency. Your checkout looks and feels like your own, which matters when you're asking a buyer in another country to trust you with their payment. Setup takes more work than a hosted page, but much less than a full direct connection.
A direct connection gives your development team full control over the checkout experience. Your system talks directly to the provider's system, and every part of the payment flow lives on your platform.
This is the right fit if you process high volumes, need a fully custom checkout for different buyer segments, or want to build features like saved cards and one-click payments. It requires a dedicated development team and ongoing maintenance, so it's typically suited for larger businesses or enterprise operations.
Tip: If you're unsure which type to pick, start with an embedded form. It gives you good control over your checkout without the heavy setup of a direct connection. You can always upgrade later.
Picking the wrong provider doesn't just create technical problems. It affects how many of your international customers complete their purchase, how quickly you get paid, and how much you spend per transaction.
Here's what to evaluate before you commit.
Choosing a payment partner is one of the few decisions that directly touches every transaction your business processes. Take the time to compare based on what your specific buyers and markets need.
Note: Ask for a test environment before going live. A quick test run with a real checkout flow will show you exactly what your customer will experience.
Some of the most expensive payment problems don't show up as error messages. They show up as slowly declining conversion rates, rising support tickets, and buyers who visit once and never come back.
Here are the specific mistakes to avoid.
Most of these mistakes aren't hard to fix. They just need someone to look at the checkout from the buyer's perspective.
Tip: Once a month, go through your own checkout as if you were a customer in a different country. Use a different device. Try a different payment method. You'll spot problems your team might miss.
Your checkout is live but underperforming, or you haven't started yet. Either way, the setup process follows the same path. Here's how to do it effectively:
1. Identify your markets and currencies: List the countries your buyers come from. Then confirm which currencies and payment methods are common in each market. This shapes every decision that follows.
2. Pick your integration type: Based on your team's skills and your business size, choose between a hosted page, embedded form, or direct connection. (Refer to the comparison table above.)
3. Select your payment gateway: Evaluate against the criteria in the previous section. Sign up, complete verification, and get access to your provider's dashboard.
4. Connect your platform: If you're on Shopify, WooCommerce, or a similar platform, install the plugin your provider offers. For custom sites, follow the provider's documentation to add the checkout form or connect your system.
5. Set up your currencies and methods: In your provider's dashboard, enable the currencies and payment methods relevant to your buyers. Don't enable everything at once. Start with your top three to five markets.
6. Run test transactions: Process test payments using real checkout flows. Test card payments, digital wallets, declines, and refunds. Check that confirmation messages, error screens, and email receipts all work correctly.
7. Go live and monitor: Once testing is complete, switch to live mode. Watch your transaction dashboard closely for the first week. Look for unusual decline rates or errors, and review your bank reconciliation reports to make sure funds are matching up.
The entire process, from sign-up to live checkout, can take anywhere from a few hours (for plugin-based setups) to a few weeks (for direct connections).
Tip: Keep a checklist of every payment method and currency you've enabled. Review it quarterly to add methods for new markets or remove ones that aren't performing.
If your international buyers are dropping off at checkout, the problem usually isn't your product or your pricing. It's how your payment step works. Slow authorization, missing payment methods, or unfamiliar checkout screens push buyers away before they finish paying.
PayGlocal is built specifically for businesses in India that sell to global customers. Here's what it offers.
PayGlocal gives you a cross-border checkout built to convert. No setup fees. No platform fees. You pay only when you process a transaction.
Your payment checkout is the last step between a global buyer and your revenue. If it's slow, confusing, or missing the payment method they trust, they leave. Seamless payment integration fixes that by keeping the entire experience inside your platform, in the buyer's currency, with the methods they prefer.
Start by looking at your current checkout through your buyer's eyes. Check your completion rates by country. Identify which markets have the highest drop-off. Then fix them with the right integration type and provider.
Every month you wait is another month of lost international sales. Get started with PayGlocal today and give your global buyers the checkout they expect.
1. How long does it take to set up a payment integration for an online store?
It depends on the method. Plugin-based setups on platforms like Shopify or WooCommerce can go live in a few hours. Custom integrations through a direct connection may take a few weeks, depending on your development team's availability.
2. Do I need a developer to set up payment integration?
Not always. Many providers offer no-code plugins for popular e-commerce platforms. If you need a custom checkout flow, you'll need a developer familiar with your website's code.
3. Can I accept payments from buyers who don't have a credit card?
Yes, if your payment setup supports alternate methods like bank transfers, digital wallets, or buy-now-pay-later options. The key is choosing a provider that covers the payment methods common in your buyer's country.
4. What happens if a payment fails during checkout?
The buyer typically sees an error message on your checkout page. A well-built integration will suggest an alternate payment method or prompt the buyer to re-enter their details, rather than showing a blank error screen.
5. Is it possible to accept payments in one currency and receive funds in another?
Yes, this is called currency conversion at settlement. Your buyer pays in their local currency, and the provider converts it to your preferred currency before depositing it into your account.
Research shows 18% of US online shoppers have left a purchase behind just because checkout felt longer or more complex. For international buyers, every additional step pushes them closer to leaving your checkout. Seamless payment integration fixes this issue by letting buyers complete their payment directly on your website.
This guide breaks down in detail what seamless payment integration actually is, how it works for global businesses, and the exact steps to set it up the right way.
Key takeaways
- Seamless payment integration defined: It connects your payment system directly to your website or app so customers pay without leaving your platform or seeing extra screens.
- Cross-border impact: For Indian businesses selling globally, a well-connected checkout reduces failed transactions and builds trust with international buyers.
- Integration types matter: Hosted payment pages, embedded forms, and direct connections each come with trade-offs in control, speed, and setup effort.
- Choosing a provider: Look for multi-currency support, fraud protection built for cross-border transactions, and a setup process that matches your team's skills.
- PayGlocal for global sellers: Supports 40+ payment methods across 180+ countries with a checkout built for cross-border payment success.
What is seamless payment integration?
Every time a customer reaches your checkout and something feels off, you risk losing that sale. A redirect to an unknown page, a slow-loading form, or an unfamiliar payment screen is enough to make someone leave.
Seamless payment integration connects your payment processing directly to your website or app. Your customer enters their payment details, completes the purchase, and gets a confirmation. All of it happens without being sent to a different page or a third-party site.
For instance, for an Indian business selling to a buyer in Canada, here's what that looks like in practice. The buyer adds a product to their cart, selects their preferred method (say, a local digital wallet or a credit card), sees the price in CAD, and pays. The entire process happens inside your website. Behind the scenes, the payment is authorized, the foreign exchange conversion is handled, and your funds are routed for settlement.
Why does seamless payment integration matter for global businesses?
A single extra step in your checkout can cost you a paying customer. When that customer is in a different country, using a different currency, and already unsure whether your site is trustworthy, the risk is even higher. Here's why getting this right directly affects your revenue.
- Fewer abandoned checkouts: When buyers stay on your site throughout the payment process, they're far more likely to finish the purchase.
- Stronger buyer trust: International customers are cautious about entering card details on unfamiliar screens. A checkout that looks and feels like part of your site builds confidence.
- Higher approval rates: A well-connected payment setup sends the right data to banks and card networks, which leads to more approved transactions and fewer silent declines.
- Faster reconciliation: When payments flow into one system, your finance team spends less time matching payment transactions across platforms.
- Better repeat purchase rates: Customers who had a smooth first experience are more likely to come back and buy again.
For Indian exporters, freelancers, and SaaS businesses collecting from global buyers, payment friction directly affects how fast you grow internationally.
Tip: If your current checkout redirects buyers to a third-party page, check your payment completion rates. Even a few percentage points of improvement from fixing that redirect can add up fast.
How does seamless payment integration work?
Most businesses know they need a good checkout. But only a few know what actually happens between the moment a customer clicks the pay button and the money reaches your account. Here's what happens, step-by-step:
1. Customer selects a payment method: At checkout, the buyer picks from the options you offer (credit card, digital wallet, bank transfer, etc.) and enters their details.
2. Payment data is sent securely: Your website sends the encrypted payment information to your payment provider's system. This happens in the background, with no page change for the buyer.
3. Authorization request: Your provider sends the transaction details to the buyer's bank or card network for approval. For international payments, this also includes currency and fraud checks.
4. Approval or decline: The bank responds in seconds. If approved, the buyer sees a success message on your site. If declined, they see an error with a clear next step.
5. Settlement: The approved funds are collected, converted to your preferred currency if needed, and deposited into your account on the agreed schedule.
The entire process takes a few seconds from the buyer's side. On the back end, the speed and reliability of this flow depend on how well your payment system is connected to your platform.
Note: If you sell to buyers in regions with low credit card usage (like parts of Southeast Asia or Europe), make sure your integration supports alternate payment methods for those markets.
What are the types of seamless payment integration?
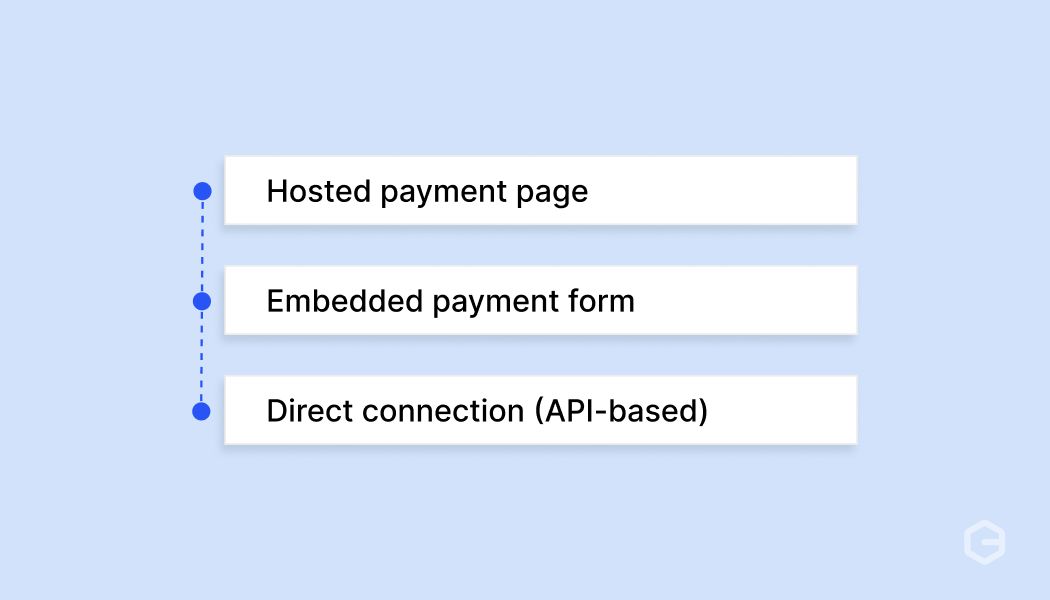
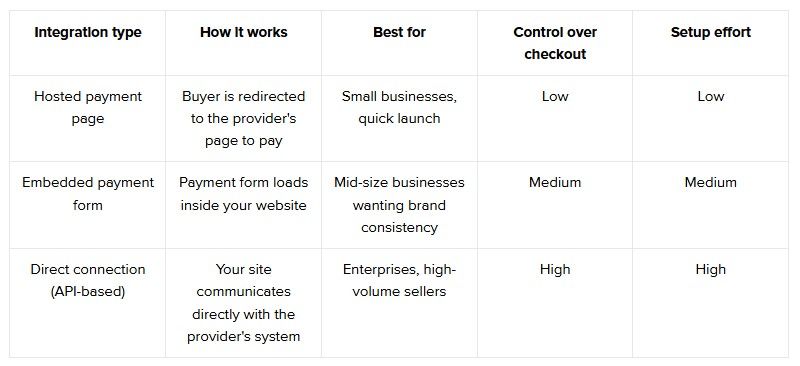
The payment method you choose affects how much control you have over your checkout, how fast it loads, and how much work your team needs to put in. Here's a quick comparison of the main types.
Each type has a clear trade-off between ease of setup and control over the customer experience.
When does a hosted payment page make sense?
A hosted page sends your customer to a separate, provider-managed page to complete the payment. After they pay, they're redirected back to your site.
This is the fastest way to start accepting payments. You don't need a developer to build a custom checkout. The provider handles security, card data storage, and compliance on their end. For a new exporter or a freelancer setting up their first invoice payment flow, this gets you live quickly.
The trade-off is that the buyer leaves your site, even if briefly. For international customers who don't recognize the provider's brand, that redirect can feel risky.
When should you use an embedded payment form?
An embedded form loads inside your website, usually as a small module within your existing checkout page. The buyer enters their card or payment details without leaving your site, but the actual processing is handled securely by the provider in the background.
This gives you brand consistency. Your checkout looks and feels like your own, which matters when you're asking a buyer in another country to trust you with their payment. Setup takes more work than a hosted page, but much less than a full direct connection.
When is a direct connection the right choice?
A direct connection gives your development team full control over the checkout experience. Your system talks directly to the provider's system, and every part of the payment flow lives on your platform.
This is the right fit if you process high volumes, need a fully custom checkout for different buyer segments, or want to build features like saved cards and one-click payments. It requires a dedicated development team and ongoing maintenance, so it's typically suited for larger businesses or enterprise operations.
Tip: If you're unsure which type to pick, start with an embedded form. It gives you good control over your checkout without the heavy setup of a direct connection. You can always upgrade later.
What should you look for in a payment integration partner?
Picking the wrong provider doesn't just create technical problems. It affects how many of your international customers complete their purchase, how quickly you get paid, and how much you spend per transaction.
Here's what to evaluate before you commit.
- Multi-currency support: Your provider should let buyers pay in their own currency. A checkout that only shows INR or USD will lose buyers in markets like Europe, the Middle East, and Southeast Asia.
- Local payment methods: Credit cards aren't the preferred way to pay everywhere. In some markets, bank transfers, digital wallets, or buy-now-pay-later options are far more common. Your provider should cover the methods your buyers actually use.
- Fraud detection for cross-border sales: International transactions carry higher fraud risk than domestic ones. Look for a provider with built-in fraud prevention that can tell the difference between a real buyer and a suspicious transaction, without blocking good customers.
- Clear pricing: Know the per-transaction fee, currency conversion costs, and any monthly or setup charges. If pricing isn't published or easy to find, treat that as a warning sign.
- Integration options: Check whether the provider offers no-code plugins (for platforms like Shopify or WooCommerce), embedded checkout, and a direct connection. You want a setup that matches your team's current skills, with room to grow.
- Settlement speed and tracking: Know how long it takes for funds to reach your bank account. Real-time tracking and notifications on fund status save your finance team hours of follow-up.
Choosing a payment partner is one of the few decisions that directly touches every transaction your business processes. Take the time to compare based on what your specific buyers and markets need.
Note: Ask for a test environment before going live. A quick test run with a real checkout flow will show you exactly what your customer will experience.
What mistakes do businesses make with payment integration?
Some of the most expensive payment problems don't show up as error messages. They show up as slowly declining conversion rates, rising support tickets, and buyers who visit once and never come back.
Here are the specific mistakes to avoid.
- Offering only one currency: If your checkout shows everything in INR and your buyer is in the UK, they have to guess the final amount. That uncertainty causes drop-offs.
- Ignoring mobile checkout: A large share of international buyers pay from their phones. If your checkout doesn't load properly on mobile, you'll lose them before they even see the payment form.
- Skipping test transactions: Going live without testing the full payment flow (including declines, refunds, and recurring charges) leads to problems your real customers shouldn't be the first to find.
- No fallback for payment failures: If a card is declined, what happens next? If the answer is a generic error page with no guidance, that buyer is gone. Show a clear message and offer an alternate payment method.
- Not reviewing transaction reports: Your payment data tells you where buyers drop off, which methods have the highest failure rates, and which markets perform best. Ignoring this data leaves revenue on the table.
- Overcomplicating the form: Every extra field you add to your checkout reduces completion rates. Only ask for what's necessary.
Most of these mistakes aren't hard to fix. They just need someone to look at the checkout from the buyer's perspective.
Tip: Once a month, go through your own checkout as if you were a customer in a different country. Use a different device. Try a different payment method. You'll spot problems your team might miss.
How do you set up and get started with seamless payment integration?
Your checkout is live but underperforming, or you haven't started yet. Either way, the setup process follows the same path. Here's how to do it effectively:
1. Identify your markets and currencies: List the countries your buyers come from. Then confirm which currencies and payment methods are common in each market. This shapes every decision that follows.
2. Pick your integration type: Based on your team's skills and your business size, choose between a hosted page, embedded form, or direct connection. (Refer to the comparison table above.)
3. Select your payment gateway: Evaluate against the criteria in the previous section. Sign up, complete verification, and get access to your provider's dashboard.
4. Connect your platform: If you're on Shopify, WooCommerce, or a similar platform, install the plugin your provider offers. For custom sites, follow the provider's documentation to add the checkout form or connect your system.
5. Set up your currencies and methods: In your provider's dashboard, enable the currencies and payment methods relevant to your buyers. Don't enable everything at once. Start with your top three to five markets.
6. Run test transactions: Process test payments using real checkout flows. Test card payments, digital wallets, declines, and refunds. Check that confirmation messages, error screens, and email receipts all work correctly.
7. Go live and monitor: Once testing is complete, switch to live mode. Watch your transaction dashboard closely for the first week. Look for unusual decline rates or errors, and review your bank reconciliation reports to make sure funds are matching up.
The entire process, from sign-up to live checkout, can take anywhere from a few hours (for plugin-based setups) to a few weeks (for direct connections).
Tip: Keep a checklist of every payment method and currency you've enabled. Review it quarterly to add methods for new markets or remove ones that aren't performing.
Improve your checkout with seamless payment integration using PayGlocal
If your international buyers are dropping off at checkout, the problem usually isn't your product or your pricing. It's how your payment step works. Slow authorization, missing payment methods, or unfamiliar checkout screens push buyers away before they finish paying.
PayGlocal is built specifically for businesses in India that sell to global customers. Here's what it offers.
- Dynamic checkout: Your buyers see a checkout that adapts to their location and preferred payment method, making it easier for them to complete their purchase.
- Global payment methods: Buyers in 180+ countries can pay using 40+ local options they already trust, which increases the chance they finish checkout.
- Multi-currency accounts: You collect payments in 33+ currencies and receive a foreign inward remittance certificate (FIRC) directly from the dashboard, keeping compliance simple.
- Recurring payments: Subscription charges go through on schedule with auto-debit on international cards, and your revenue stays consistent without manual follow-up.
- One platform: You set up, track, and manage all your global payments from a single dashboard, so your team spends less time switching between tools.
PayGlocal gives you a cross-border checkout built to convert. No setup fees. No platform fees. You pay only when you process a transaction.
Final thoughts
Your payment checkout is the last step between a global buyer and your revenue. If it's slow, confusing, or missing the payment method they trust, they leave. Seamless payment integration fixes that by keeping the entire experience inside your platform, in the buyer's currency, with the methods they prefer.
Start by looking at your current checkout through your buyer's eyes. Check your completion rates by country. Identify which markets have the highest drop-off. Then fix them with the right integration type and provider.
Every month you wait is another month of lost international sales. Get started with PayGlocal today and give your global buyers the checkout they expect.
FAQs
1. How long does it take to set up a payment integration for an online store?
It depends on the method. Plugin-based setups on platforms like Shopify or WooCommerce can go live in a few hours. Custom integrations through a direct connection may take a few weeks, depending on your development team's availability.
2. Do I need a developer to set up payment integration?
Not always. Many providers offer no-code plugins for popular e-commerce platforms. If you need a custom checkout flow, you'll need a developer familiar with your website's code.
3. Can I accept payments from buyers who don't have a credit card?
Yes, if your payment setup supports alternate methods like bank transfers, digital wallets, or buy-now-pay-later options. The key is choosing a provider that covers the payment methods common in your buyer's country.
4. What happens if a payment fails during checkout?
The buyer typically sees an error message on your checkout page. A well-built integration will suggest an alternate payment method or prompt the buyer to re-enter their details, rather than showing a blank error screen.
5. Is it possible to accept payments in one currency and receive funds in another?
Yes, this is called currency conversion at settlement. Your buyer pays in their local currency, and the provider converts it to your preferred currency before depositing it into your account.