
Around 85% of all digital transactions in India are UPI-based. One of the essential technologies that helps in successful UPI payments is the VPA.
The VPA stands for Virtual Payment Address, and it's the foundation that makes UPI payments so simple and secure. Whether you're sending money to a friend, paying for groceries, or receiving payments for your business, VPA helps you use digital payments more securely and efficiently.
In this guide, we break down everything about VPA, from its full form to tips on creating and using it effectively. Find out how VPAs work, see real examples, and discover best practices that keep your payments secure.
- VPA means Virtual Payment Address: A unique digital ID that replaces bank account details in UPI transactions.
- VPAs work 24/7 across all UPI apps: Enabling instant money transfers between any UPI-enabled platforms like GPay, PhonePe, and Paytm.
- VPA simplifies business payments: With VPA, customers can pay you quickly without asking for bank details, making transactions faster and more efficient.
- Global payment platform: PayGlocal helps you collect international payments with the same ease as domestic UPI, offering multi-currency accounts and different global payment methods.
VPA's full form is Virtual Payment Address. It's a unique identifier that acts as your digital payment address within India's Unified Payments Interface (UPI) system.
Think of it as an email address for money. Just as you use an email to send messages, you use a VPA to send and receive payments. Instead of sharing your bank account number, IFSC code, and other sensitive details, you simply share your VPA.
A typical VPA looks like "yourname@paytm" or "user123@upi". The format includes a username you choose, followed by the @ symbol, and then your bank or UPI app's handle. This simple format makes digital payments as easy as sending a text message.
VPAs simplify the entire payment process by connecting your bank account and UPI apps. When someone sends money to your VPA, the UPI system identifies your linked bank account and processes the transfer automatically. Here's how a typical VPA transaction works:
1. Sender enters your VPA: They type your VPA address in their UPI app instead of asking for bank details.
2. UPI system verifies the address: The network confirms your VPA exists and is active.
3. Fund gets processed: Money moves from the sender's account to your linked bank account.
4. Payment confirmation: You receive instant notifications about the successful transfer.
5. Settlement happens immediately: Funds appear in your account within seconds, available for use.
VPAs come in different formats depending on which bank or UPI app you use. Each provider offers its own handle or suffix that appears after the @ symbol.
The handle you get depends on where you create your VPA. For instance, if you set up UPI through your HDFC Bank app, your VPA will end with @hdfcbank. If you use PhonePe, it will end with @ybl.
You can create multiple VPAs and use different ones for different purposes. Many people have one VPA for personal use and another for business transactions, making it easier to track and manage payments.
Virtual Payment Addresses offer several advantages that make digital payments more convenient and secure for everyday users. Some of the key benefits of VPA include:
- Privacy protection: You don't need to share sensitive bank account details with anyone. Your VPA keeps your banking information private while enabling seamless transactions.
- Easy to remember: Unlike 16-digit account numbers, VPAs use simple, memorable formats. You can choose usernames that make sense to you, like your name or business.
- Works across all UPI apps: Your VPA functions the same way whether someone pays you through GPay, PhonePe, Paytm, or any other UPI-enabled app.
- Instant verification: When someone enters your VPA, they can verify it's correct before sending money. This reduces errors and failed transactions.
- 24/7 availability: VPA works around the clock, including weekends and holidays. You can send or receive money anytime without banking hours restrictions.
- No additional charges: Creating and using a VPA is completely free. Banks and UPI apps don't charge extra fees for VPA-based transactions.
Creating a VPA is straightforward and takes just a few minutes through any UPI-enabled app or your bank's mobile banking application. Here’s a complete step-by-step process:
1. Download a UPI app: Choose from popular options like Google Pay, PhonePe, Paytm, or your bank's own app.
2. Register your mobile number: Enter the phone number linked to your bank account for verification.
3. Select your bank: Choose which bank account you want to link with your VPA.
4. Create your VPA ID: Pick a unique username that's easy to remember. Most apps suggest options or let you customize.
5. Set your UPI PIN: Create a secure 4 or 6-digit PIN that you'll use to authorize transactions.
6. Verify and activate: Complete the verification process, and your VPA becomes active immediately.
For example, when setting up VPA in Google Pay, you might get options like "yourname@oksbi" or "yourname@okhdfcbank" depending on your linked bank. You can usually modify the username part to something memorable.
Most apps also let you create multiple VPAs if you have accounts with different banks, giving you flexibility in how you manage your digital payments.
Sending money through VPA is one of the simplest ways to transfer funds in India. You don't need to remember bank account numbers or IFSC codes, just the recipient's VPA address. Here's how to send money using VPA:
1. Open your UPI app: Launch Google Pay, PhonePe, Paytm, or any UPI-enabled app.
2. Choose the send money option: Look for the "Send" or "Pay" button on your app's home screen.
3. Enter recipient's VPA: Type their VPA address in the recipient field.
4. Add payment amount: Enter the amount you want to send.
5. Add a note (optional): Write a brief message about the payment purpose.
6. Verify details: Double-check the VPA and amount before proceeding.
7. Enter UPI PIN: Input your secure PIN to authorize the transaction.
8. Get confirmation: Both you and the recipient receive instant payment confirmation.
Receiving money through your VPA is even simpler than sending it. You just need to share your VPA address with the person who wants to pay you. Follow these steps to receive payments:
1. Share your VPA: Give your VPA address to the sender.
2. Wait for payment: The sender will enter your VPA in their UPI app and send money.
3. Receive notification: You'll get an instant SMS and app notification about the incoming payment.
4. Check your account: Money appears in your linked bank account immediately.
5. Send confirmation: Let the sender know you've received the payment.
Many businesses print their VPA on visiting cards, invoices, or display boards to make it easy for customers to pay. You can also create QR codes for your VPA that customers can scan instead of typing the address manually.
If you've already set up UPI payments, you can easily find it within your UPI app's settings or profile section.
Whether you’re using PhonePe, Google Pay, or Paytm, the process is similar in all apps.
1. Profile icon: You simply need to click on your Profile picture icon in your UPI app.
2. Bank account: Then click on your connected bank account.
3. VPA: You’ll find your linked VPA.
You can also ask someone to send you a small amount (like ₹1) and check what VPA they used in the transaction details. This method works if you've shared your VPA before but forgot what it was.
Remember, you might have multiple VPAs if you've linked different bank accounts or used various UPI apps. Each combination creates a unique VPA that you can use for transactions.
UPI and VPAs work brilliantly for domestic payments, but what happens when your business grows beyond Indian borders? Whether you're a freelancer working with international clients or a business exporting services globally, traditional banking becomes complex and expensive.
That’s where PayGlocal comes in. Instead of handling multiple bank accounts, currency conversions, and compliance paperwork, you get one platform that handles everything. Here's what PayGlocal offers:
- Multi-currency local accounts in major markets: Get local bank details in the USA, UK, Europe, and Canada so your clients can pay you like a domestic vendor.
- Instant compliance documentation: Receive FIRC and other required documents automatically after each settlement, eliminating paperwork delays.
- Transparent tracking: Monitor every payment with real-time updates, similar to UPI transaction notifications but for international transfers.
- Zero setup costs: Pay only when you transact, just like UPI apps don't charge monthly fees for basic usage.
- One platform management: Handle all your international payment needs from a single dashboard, as simple as managing UPI on your phone.
PayGlocal helps you maintain the payment simplicity you're used to while expanding globally. Your international clients get local payment options, while you receive funds in INR without the traditional banking complexities.
VPA (Virtual Payment Address) has enhanced the entire digital payment process. By replacing complex bank details with easy-to-remember addresses, VPAs removed the biggest barrier to digital transactions, making the entire process more secure and efficient.
But as your payment needs grow beyond domestic transfers, you need a reliable solution like PayGlocal that can handle faster global payments, all in one place.
Start collecting payments from global clients without expensive charges or delay. Get started with PayGlocal today.
The VPA stands for Virtual Payment Address, and it's the foundation that makes UPI payments so simple and secure. Whether you're sending money to a friend, paying for groceries, or receiving payments for your business, VPA helps you use digital payments more securely and efficiently.
In this guide, we break down everything about VPA, from its full form to tips on creating and using it effectively. Find out how VPAs work, see real examples, and discover best practices that keep your payments secure.
Key Takeaways:
- VPA means Virtual Payment Address: A unique digital ID that replaces bank account details in UPI transactions.
- VPAs work 24/7 across all UPI apps: Enabling instant money transfers between any UPI-enabled platforms like GPay, PhonePe, and Paytm.
- VPA simplifies business payments: With VPA, customers can pay you quickly without asking for bank details, making transactions faster and more efficient.
- Global payment platform: PayGlocal helps you collect international payments with the same ease as domestic UPI, offering multi-currency accounts and different global payment methods.
What is the VPA full form?
VPA's full form is Virtual Payment Address. It's a unique identifier that acts as your digital payment address within India's Unified Payments Interface (UPI) system.
Think of it as an email address for money. Just as you use an email to send messages, you use a VPA to send and receive payments. Instead of sharing your bank account number, IFSC code, and other sensitive details, you simply share your VPA.
A typical VPA looks like "yourname@paytm" or "user123@upi". The format includes a username you choose, followed by the @ symbol, and then your bank or UPI app's handle. This simple format makes digital payments as easy as sending a text message.
How does VPA work in UPI payments?
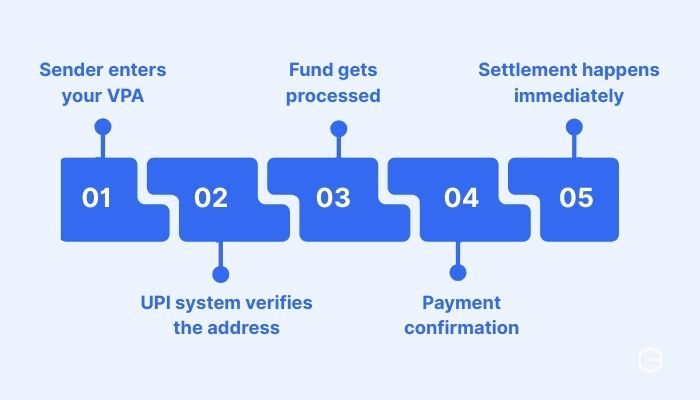
VPAs simplify the entire payment process by connecting your bank account and UPI apps. When someone sends money to your VPA, the UPI system identifies your linked bank account and processes the transfer automatically. Here's how a typical VPA transaction works:
1. Sender enters your VPA: They type your VPA address in their UPI app instead of asking for bank details.
2. UPI system verifies the address: The network confirms your VPA exists and is active.
3. Fund gets processed: Money moves from the sender's account to your linked bank account.
4. Payment confirmation: You receive instant notifications about the successful transfer.
5. Settlement happens immediately: Funds appear in your account within seconds, available for use.
What are the types and examples of VPA?
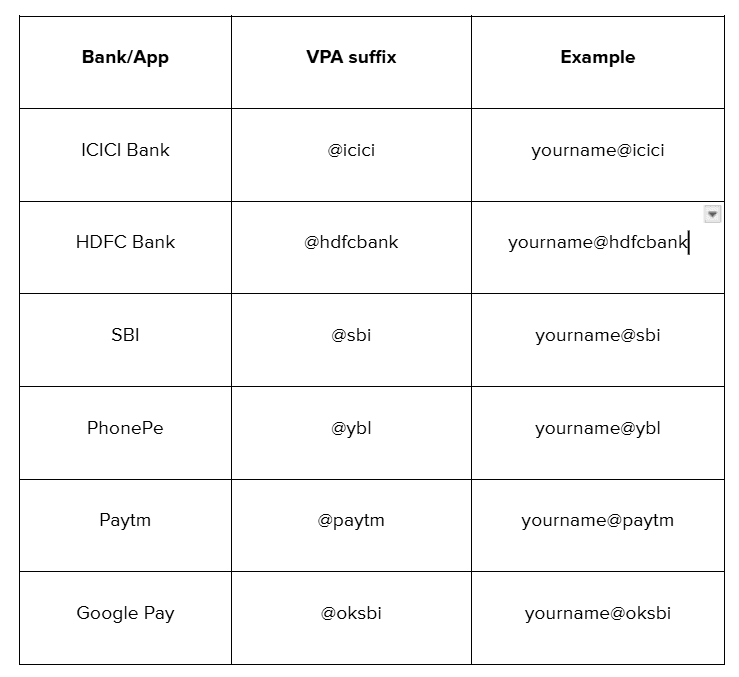
VPAs come in different formats depending on which bank or UPI app you use. Each provider offers its own handle or suffix that appears after the @ symbol.
The handle you get depends on where you create your VPA. For instance, if you set up UPI through your HDFC Bank app, your VPA will end with @hdfcbank. If you use PhonePe, it will end with @ybl.
You can create multiple VPAs and use different ones for different purposes. Many people have one VPA for personal use and another for business transactions, making it easier to track and manage payments.
What are the benefits of using VPA?
Virtual Payment Addresses offer several advantages that make digital payments more convenient and secure for everyday users. Some of the key benefits of VPA include:
- Privacy protection: You don't need to share sensitive bank account details with anyone. Your VPA keeps your banking information private while enabling seamless transactions.
- Easy to remember: Unlike 16-digit account numbers, VPAs use simple, memorable formats. You can choose usernames that make sense to you, like your name or business.
- Works across all UPI apps: Your VPA functions the same way whether someone pays you through GPay, PhonePe, Paytm, or any other UPI-enabled app.
- Instant verification: When someone enters your VPA, they can verify it's correct before sending money. This reduces errors and failed transactions.
- 24/7 availability: VPA works around the clock, including weekends and holidays. You can send or receive money anytime without banking hours restrictions.
- No additional charges: Creating and using a VPA is completely free. Banks and UPI apps don't charge extra fees for VPA-based transactions.
How to create your VPA?
Creating a VPA is straightforward and takes just a few minutes through any UPI-enabled app or your bank's mobile banking application. Here’s a complete step-by-step process:
1. Download a UPI app: Choose from popular options like Google Pay, PhonePe, Paytm, or your bank's own app.
2. Register your mobile number: Enter the phone number linked to your bank account for verification.
3. Select your bank: Choose which bank account you want to link with your VPA.
4. Create your VPA ID: Pick a unique username that's easy to remember. Most apps suggest options or let you customize.
5. Set your UPI PIN: Create a secure 4 or 6-digit PIN that you'll use to authorize transactions.
6. Verify and activate: Complete the verification process, and your VPA becomes active immediately.
For example, when setting up VPA in Google Pay, you might get options like "yourname@oksbi" or "yourname@okhdfcbank" depending on your linked bank. You can usually modify the username part to something memorable.
Most apps also let you create multiple VPAs if you have accounts with different banks, giving you flexibility in how you manage your digital payments.
How to send money using VPA?
Sending money through VPA is one of the simplest ways to transfer funds in India. You don't need to remember bank account numbers or IFSC codes, just the recipient's VPA address. Here's how to send money using VPA:
1. Open your UPI app: Launch Google Pay, PhonePe, Paytm, or any UPI-enabled app.
2. Choose the send money option: Look for the "Send" or "Pay" button on your app's home screen.
3. Enter recipient's VPA: Type their VPA address in the recipient field.
4. Add payment amount: Enter the amount you want to send.
5. Add a note (optional): Write a brief message about the payment purpose.
6. Verify details: Double-check the VPA and amount before proceeding.
7. Enter UPI PIN: Input your secure PIN to authorize the transaction.
8. Get confirmation: Both you and the recipient receive instant payment confirmation.
How to receive money through VPA?
Receiving money through your VPA is even simpler than sending it. You just need to share your VPA address with the person who wants to pay you. Follow these steps to receive payments:
1. Share your VPA: Give your VPA address to the sender.
2. Wait for payment: The sender will enter your VPA in their UPI app and send money.
3. Receive notification: You'll get an instant SMS and app notification about the incoming payment.
4. Check your account: Money appears in your linked bank account immediately.
5. Send confirmation: Let the sender know you've received the payment.
Many businesses print their VPA on visiting cards, invoices, or display boards to make it easy for customers to pay. You can also create QR codes for your VPA that customers can scan instead of typing the address manually.
How to find your existing VPA?
If you've already set up UPI payments, you can easily find it within your UPI app's settings or profile section.
Whether you’re using PhonePe, Google Pay, or Paytm, the process is similar in all apps.
1. Profile icon: You simply need to click on your Profile picture icon in your UPI app.
2. Bank account: Then click on your connected bank account.
3. VPA: You’ll find your linked VPA.
You can also ask someone to send you a small amount (like ₹1) and check what VPA they used in the transaction details. This method works if you've shared your VPA before but forgot what it was.
Remember, you might have multiple VPAs if you've linked different bank accounts or used various UPI apps. Each combination creates a unique VPA that you can use for transactions.
Manage global payments faster and smarter with PayGlocal
UPI and VPAs work brilliantly for domestic payments, but what happens when your business grows beyond Indian borders? Whether you're a freelancer working with international clients or a business exporting services globally, traditional banking becomes complex and expensive.
That’s where PayGlocal comes in. Instead of handling multiple bank accounts, currency conversions, and compliance paperwork, you get one platform that handles everything. Here's what PayGlocal offers:
- Multi-currency local accounts in major markets: Get local bank details in the USA, UK, Europe, and Canada so your clients can pay you like a domestic vendor.
- Instant compliance documentation: Receive FIRC and other required documents automatically after each settlement, eliminating paperwork delays.
- Transparent tracking: Monitor every payment with real-time updates, similar to UPI transaction notifications but for international transfers.
- Zero setup costs: Pay only when you transact, just like UPI apps don't charge monthly fees for basic usage.
- One platform management: Handle all your international payment needs from a single dashboard, as simple as managing UPI on your phone.
PayGlocal helps you maintain the payment simplicity you're used to while expanding globally. Your international clients get local payment options, while you receive funds in INR without the traditional banking complexities.
Final Thoughts
VPA (Virtual Payment Address) has enhanced the entire digital payment process. By replacing complex bank details with easy-to-remember addresses, VPAs removed the biggest barrier to digital transactions, making the entire process more secure and efficient.
But as your payment needs grow beyond domestic transfers, you need a reliable solution like PayGlocal that can handle faster global payments, all in one place.
Start collecting payments from global clients without expensive charges or delay. Get started with PayGlocal today.